First Look @ Uniden HomePatrol

First Look @ Uniden HomePatrol
By Jonathan Higgins

Release Date: Early Fall 2010 – 09/30/10
Price: $495.00

Uniden HomePatrol
Recently I had the opportunity to see the New Uniden HomePatrol in action. This product is very simple to operate, you can be up and running within 3 minutes or less. No programming needed all you need is your zip code. Once your Zip Code is entered, HomePatrol will load Police, Fire and EMS channels in your area and you have the option to also scan Utilities, Airports, Railroads, Businesses, schools and other services in your area that area listed on the Radio Reference database.

My initial thoughts of the HomePatrol:
This cutting edge technology from Uniden will take the work out of programming. The menus are very straight forward and simple. The reception was amazing with the stock antenna that came with the unit. This product would be ideal for someone just getting into the hobby, or just looking for something that is very simple to operate.

Advanced Users
Advanced users may find the HomePatrol limits your ability to customize the programming. I would still recommend the Uniden BCD396XT or BCD996XT to advanced users. For myself HomePatrol would be great for traveling outside of my listening area, because I wouldn’t need to spend time setting up the programming.

GPS ScanningHomePatrol would be a great for Road Trips too! By connecting a GPS Receiver the system will select all of the agencies in your area and it will keep updating as you travel.

Building Favorites Lists
You can make your own favorites Lists from the database in HomePatrol. If you only like to listen to fire call you can go into the database and select those departments. You can name and save each favorites list. I really like this option because you can customize what you’re monitoring.

Instant Replay
Did you miss a transmission? You can replay radio transmission from the last 30 Seconds to 240 seconds; you can set the replay time through the Advanced Menu options.

Updating HomePatrol
With the HomePatrol Sentinel PC Software you can update the internal database within minutes. When needed HomePatrol may need a Firmware update, these are simple and done through the software. Also with-in the software you can make and save your own custom Favorites Lists.


HomePatrol Appearance and Jacks
Screen:Full Color Touch Screen

Buttons:
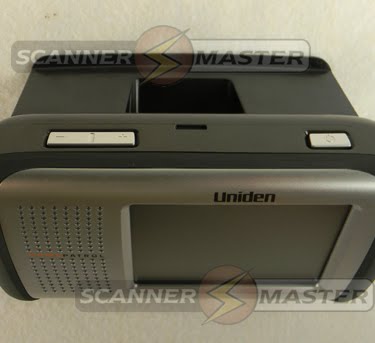
Volume Control and Power Buttons
Jacks:
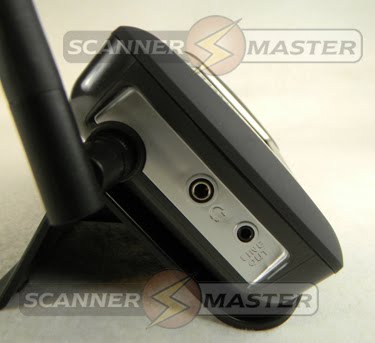
Left to Right – SMA Antenna Jack, Head Phone Jack, and Line Out Jack
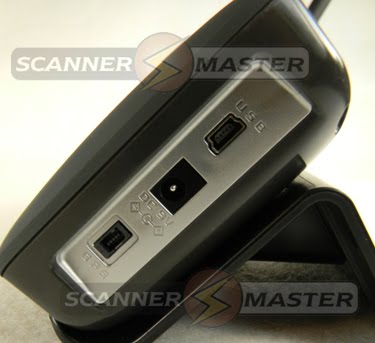

Left to Right – GPS Jack, DC 9V Power Jack Jack, and USB – Programming/Updating Jack

In the Box:
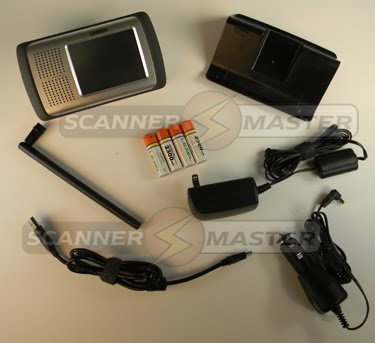
HomePatrol will come with Flex Antenna, AC Adapter, DC Cigarette Lighter Adapter, 4 AA Rechargeable batteries USB Cable, Desk Stand, and a quick Start Guide.

Frequency Coverage:
25-54 MHz
108-512 MHz
758-960 MHz

Communications Systems Covered:

  • EDACS Wide/Narrow
  • LTR
  • Motorola
  • Conventional
  • Digital (Project 25)
  • Analog

    Specifications for this unit are subject to change without notice by the manufacturer.

    Great Links:
    HomePatrol Offcial Website
    HomePatrol Yahoo Group
    HomePatrol Yahoo Group Links

    HomePatrol on YouTube:
    HomePatrol Launch Part 1
    HomePatrol Launch Part 2
    HomePatrol Launch Part 3

  • Riding the Rails into Baltimore, MD

    If you like trains and railroading, like I do, bring your scanner with you the next time you take a train trip. It will give you an exciting behind the scenes look at railroading!

    Last weekend I took a trip on Amtrak Northeast Regional from Providence, RI to Baltimore, MD for a mini weekend vacation with my wife. I thought this would be a great opportunity to monitor railroad communications on the move rather than from my hobby room.


    My gear for the trip:

    Small notebookThis was the first time I used an ear-piece for scanning, the Shadow Earpiece was very comfortable plus I could enjoy listening without disturbing anyone else. This was the first time using AA Lithium batteries with my scanner… I put in a fresh set of batteries at the start of my trip and I never had to change them.Frequencies:
    I was able to find a few frequencies here and there online. This was a great opportunity to use the scanner “Railroad Service Search”and the (Uniden) Close Call feature.Below I found the Road Channels for each region along the Northeast Corridor from Boston to Washington DC:

    Boston, MA – New Haven, CT
    Road Channel – 160.9200 ARR Channel 54

    New Haven, CT – New Rochelle, NY
    Road Channel – 160.5450 ARR Channel 29

    New Rochelle, NY – Philadelphia, PA
    Road Channel – 161.0100 ARR Channel 60

    Philadelphia, PA – Washington, DC
    Road Channel – 160.9200 ARR Channel54

    What are Road Channels?
    For Amtrak these channels are used for the train crew and for train to dispatcher communications.

    Monitoring around Baltimore, MD:
    Once I got into Baltimore I switched gears from rail to public safety communications. The city of Baltimore has a 800MHz Motorola Type II Smart Zone Trunking system with 98% of the talk groups using digital (P25) voice communications. So a digital scanner is a must for this area. I was getting great reception in most area.

    Who is on the City of Baltimore Trucking System?

    • Fire
    • Police
    • Public Works

    ***As of right now this system is not rebanded.***

    I was able to monitor both Security at Camden Yards and B & O Railroad Museum from my hotel room a little over a mile away. I could also hear a lot of CSX Railroad communications as well.

    Scanner 101 – Cloning Uniden XT Scanners

    Have you ever wanted to clone your programming from Uniden BCD996XT to another Uniden BCD996XT?
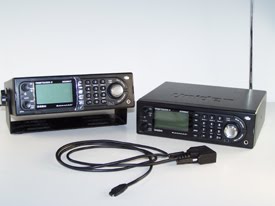
    Here are the models you can clone:***

  • BCT15X
  • BC346XT
  • BCD396XT
  • BCD996XT

    ***Note: You can ONLY clone from the same model to another of the same (like BCT15X to BCT15X or BC346XT to BC346XT and so on).

    Here is how you do it….

    Directions how to clone BCD996XT or BCT15X:

    Parts needed:
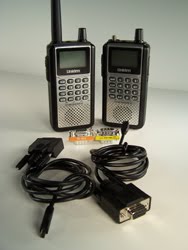
    1 Uniden 4′ Serial Cable (comes with your scanner in the box)
    Master Scanner:
    This is the scanner that has the programming that needs to be sent to the Slave.

    Slave Scanner:
    This is the scanner that needs the programming.

    Master Scanner
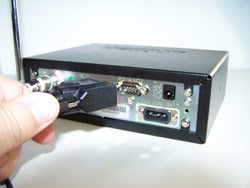
    Step 1 – First plug in the Uniden 4′ Serial Cable 9pin serial jack into the rear panel
    On the Master Scanner
    Step 2 – Press “Menu”
    Step 3 – Scroll and select to “Wired Clone”
    Step 4 – Select “Master”
    Step 5 – Select “Rear Port”

    Slave Scanner
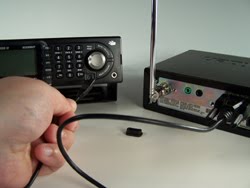
    Step 6 -Plug the mini jack into the front of the scanner.
    On the Slave Scanner
    Step 7 – Press “Menu”
    Step 8 – Scroll and select to “Wired Clone”
    Step 9 – Select “Slave”
    Step 10 – Select “Front Port”

    Last steps…
    Step 11 – Hit Scan on Slave Scanner
    Step 12 – Hit Scan on Master Scanner

    ———————————————————————–

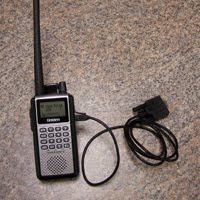
    Directions how to clone BC346XT or BCD396XT:

    Parts needed:
    >> 2 Uniden 4′ Serial Cable (comes with your scanners in the box)
    >> Null Modem
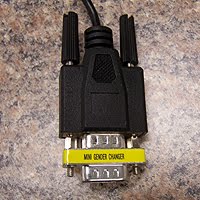
    >> Gender Changer
    Follow the steps below on how to make the cloning cable:
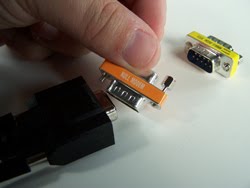
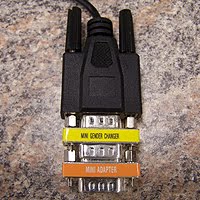
    Step 1 – Connect Uniden 4′ Serial Cable 9pin serial cable to Null Modem
    Step 2 – Connect the Null Modem to Gender Changer
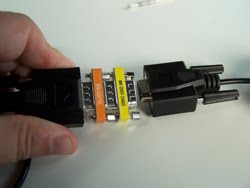
    Step 3 – then connect the second 9pin serial cable to the Gender Changer, and your clone cable is made.
    Master Scanner:
    This is the scanner that has the programming that needs to be sent to the Slave

    Slave Scanner:
    Is the scanner that needs the programming

    Slave Scanner
    Step 4 – Plug the mini jack into the right side of the scanner.
    One the Slave Scanner
    Step 5 – Press “Menu”
    Step 6 – Scroll and select to “Wired Clone”
    Step 7 – Select “Slave”

    Master Scanner
    Step 8 – Then plug the mini jack into the front panel
    Step 9 – Press “Menu”
    Step 10 – Scroll and select to “Wired Clone”
    Step 11 – Select “Master”

    Last steps…
    Step 12 – Hit Scan on Slave Scanner
    Step 13 – Hit Scan on Master Scanner

  • Product Test Uniden 4″ External Speaker

    By Jonathan Higgins

    The Product: Uniden 4″ External Speakers

    Do you have your eyes set on new base/mobile scanner? If you’re installing any base/mobile scanner in your car, trunk, home or office, please check out the Uniden 4” External Speaker. I have tried many speakers in my almost 20 years in this hobby and I have found this speaker to be one of the best. The speaker is black with Uniden’s signature paw print embossed on the speaker’s metal grill. Included in the box is the adjustable mounting bracket along with a 10 ft cold with a 1/8 (3.5mm) mono plug. You can expect high quality sound to be transmitted from this heavy duty external speaker.

    Product Specs:

  • Speaker: 4″ Plastic Cone
  • Impedance: 8 Ohms
  • Maximum Power: 12 Watts
  • Wire: 10 ft. cord
  • Plug Type: 1/8″ (3.5mm Plug)
  • Frequency Response: 500Hz-5KHz
  • Includes ratchet type mounting bracket & hardware
  • Scanner 101 – Installing the GPS Receiver for Uniden BC346XT and BCD396XT

    What is GPS Scanning?
    Once you have the scanner programmed, this feature will allow for preset scanning, making it easier and safer for you to monitor a specific area while you’re driving. The scanner, along with the GPS Receiver, will turn on and off each programmed group as you travel. How is this done? The ARCXT software allows you to set up a center point’s latitude and longitude for each group. Let’s say your home town is in group one, you can find the center point by simply entering your zip code in the software. You can set the scanning range anywhere from 0.5 to 100+ mile(s). As you approach X mile(s) of that center point, the group will become unlocked. GPS Programming will also work with trunking systems. If you set up the trunking systems with multiple sites, you can set up each site with a center point and range.

    Parts needed for this project:
    Scanner – BC346XT or BCD396XT
    Uniden 4’ Serial Cable (included in the scanner box)
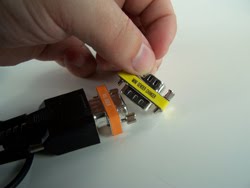
    Mini Gender Changer
    Null Modem
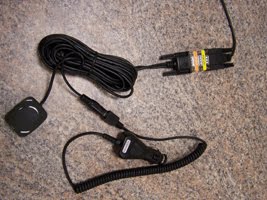
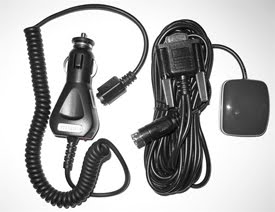
    GPS Receiver

    Once you have these features follow the step-by-step instruction below:

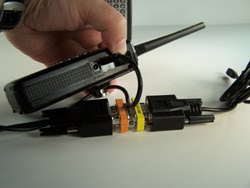
    Step 1: Plug the “Uniden 4’ Serial Cable “mini plug” into the scanner

    Step 2: Plug the other end of the Serial cable into the “Mini Gender Changer”

    Step 3: Plug the Mini Gender Changer into the Null Modem

    Step 4: Plug the Null Modem into the Serial end on the GPS Receiver


    Step 5: Plug in the Cigarette Lighter on the GPS Receiver into a available DC power outlet in your car.

    Step 6: Place magnetic GPS Antenna on a flat surface on the trunk or vehicle’s roof.

    Step 7: Power up the scanner (It may take several minutes to process the GPS info in the scanner)

    First Look at the Uniden BCD996XT

    By Jonathan Higgins

    The New Uniden BCD996XT looks very similar to the Uniden BCD996T, but its body is totally black, while the front face is glossy black. All of the buttons on the key pad are still the same, but some changes have been made to the Function Quick Keys. The Uniden BCD996XT is packed with the same great features that the recently released Uniden BCD396XT portable version has, but in the base/mobile form.

    Key feature upgrades Uniden BCD996XT
    • 25,000 Channels/ 500 Systems
    • GPS on Systems and Groups
    • Fire Tone Out with build-in tones Search
    • NAC Decoding
    • Individual Channel volume Offset
    • Support EDACS ESK
    • Multi-color display backlight (7 colors)
    • Re-banding ready
    • System/Channel Number Tagging – rapid access to channel or system

    Programming:
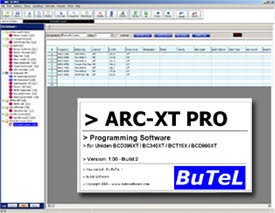
    I was able to program the scanner with ease with the ARCXT software, which works on 4 scanners (BC346XT, BCD396XT, BCD996XT and the soon to be released BC15XT). If you already own the BCD396XT and you saved the profile you can clone the BCD996XT with the same file. If you’re setting up your first XT, programming is made simple with the importing capability from RadioReference.com (with a paid membership to their website).


    HomeTown Programming:
    If you’re a beginner in this hobby and you looking to get the Uniden BCD996XT scanner I would strongly recommend our HomeTown Programming Service. After a week to ten days your scanner will be programmed and shipped to you ready to go out of the box.

    GPS Programming:
    The GPS scanning feature is amazing. Once set up, the scanner will turn on and off each programmed group as you travel. How is this done? The ARC software allows you to set up a center point’s latitude and longitude for each group. Let’s say your home town is in group one, you can find the center point by simply entering your zip code in the software. You can set the scanning range anywhere from 0.5 to 100+ mile(s). As you approach X mile(s) of that center point, the group will become unlocked. GPS Programming will also work with trunking systems. If you set up the trunking systems with multiple sites, you can set up each site with a center point and range.

    Installing the optional GPS Antenna:
    Its pretty simple, just plug the GPS antenna serial female end in the back of the serial male end on your BCD996XT. The GPS Antenna needs to be powered by simply plugging it into cigarette lighter/ mobile power outlet in your car. Then put the magnetic GPS antenna on a flat surface on the trunk or vehicle’s roof. Power-up the scanner; it may take several minute to process the GPS info.

    Road testing the Uniden BCD996XT
    In this road test, I will be hooking up the following to the Uniden BCD996XT; GPS Antenna, Comtelco Antenna with Mag mount, and the Uniden RH-96 Remote head. My first observation was that the sensitivity was great; it was able to pull in signal clearly from all around. I was amazed by the overall sound of both digital conventional and digital trunking systems. It was nice and clear without that under water sound. I found the new “Individual Channel Volume Offset” feature very handy for those low volume systems.

    What is the “Individual Channel Volume Offset”?
    This feature permits the volume adjustment of the individual channel, either up or down three notches.

    RH-96 Remote Head:
    If you have a remote head you can use it with any of the new XT models after updating the Remote Heads Firmware. You can do this once you register the remote head at Uniden.com – Firmware Link

    Final thoughts on my first test:
    Uniden made the great BCD996T even better with the BCD996XT… Better digital sound, more memory, rapid access to channels, more GPS control, and ready for rebanded systems.

    This unit is great for either a mobile or a base application.

    Helpful Links about this Product:
    Uniden BCD996XT
    ARCXT Basic Software
    ARCXT PRO Software
    GPS Receiver

    Scanner 101 – “Search With Scan”

    One feature that I find fascinating, and is available on the following Uniden models, BC246T, BC346XT, BR330T, BCT15, BCD396XT and, BCD996T is the Search With Scan. With this feature, you can run a service search or custom search as your scanner is scanning. You can set up the search in one of your available systems.

    Most Uniden Scanners have the following Service Searches:

  • Public Safety
  • News
  • HAM radio
  • Marine
  • Railroad
  • Citizen Band
  • FRS/GMRS
  • Racing
  • Military Air

    You also have the option of making 10 your own custom searches

    I like monitoring railroad communications. On long road trips I turn on this feature, so my scanner will be searching all railroad frequencies, while it’s scanning whatever else I have programmed. (In the photo to the left is the Mass Coastal GP9u 2007 sitting in Taunton, MA,)

    Below is step by step instructions:
    Step 1 – Go into the menu
    Step 2 – Select “Search for”
    Step 3 – Select “Edit Service” or “Edit Custom”
    Step 4 – Select the search you want
    Step 5 – Select “Search with Scan”
    Step 6 – Select “Set Quick Key”
    Step 7 – Select a System quick you have available 1 – 99
    Step 8 – Select “Set Lockout”
    Step 9 – Select “Unlocked”
    Step 10 – Hit “Scan”

    Check out this feature and lets us know what you think.